Configuring DNS In CentOS
DNS Server In CentOS
Installation of the DNS server
We start by checking the package that contains nslookup and named. Nslookup is a tool that can be used to query the DNS service. It is especially useful when testing the service. Named is the actual DNS Server.

We run the command "yum whatprovides nslookup", you can also run "yum whatprovides named". Both will return the same result.
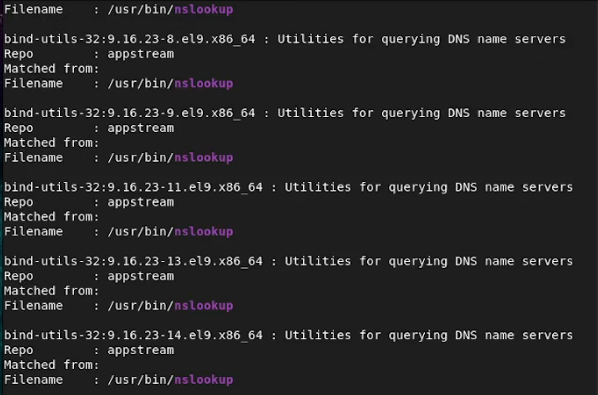
The result will be that the bind-utilities or bind-utils will be the package that will be available. This package will have the other packages such as named which is needed to run the actual DNS protocol. You can then install bind-utils by running “yum install bind-utils -y” and this will install the packages. By installing bind-utils, we install named on centos.

For us to configure “named” on centos, we need to set the resolver of the operating system. The OS needs forwards DNS queries to some given IP meant to be the DNS server. Since we have installed our own service, we need to change this so that the machine forwards DNS requests to itself. We do this by configuring the /etc/resolv.conf.
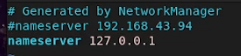
Inside the /etc/resolv.conf, you will probably find a line that says “nameserver” with an IP address listed besides it. This has to be commented out by placing a # at the front. Proceed to then include your own line that will say “nameserver 127.0.0.1”. This will make sure that the locally installed DNS service is used to handle requests.

Testing the DNS Server Using Nslookup
We can test the DNS server to see if the caching role is able to function correctly.
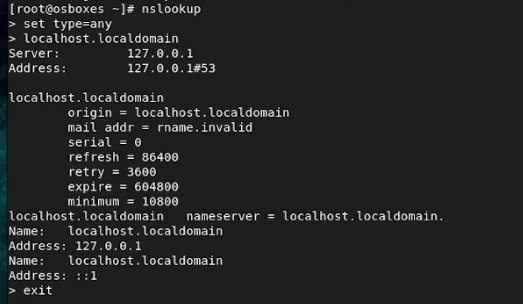
We can use nslookup to test whether the DNS server is able to resolve the localhost.localdomain to the IP address 127.0.0.1. This will test whether the service is able to operate as a caching server, if it can resolve, then it is fine.
- Start by running the command “nslookup”.
- Once in nslookup, run “set type=any” to make sure all types of records can be retrieved.
- Proceed by typing “localhost.localdomain” and press enter.
- Verify that it gives back an address of 127.0.0.1. This means its able to resolve locally.
- You can close nslookup by typing “exit”

Stop the named service so that we can then proceed to create our own local domain name.